Description
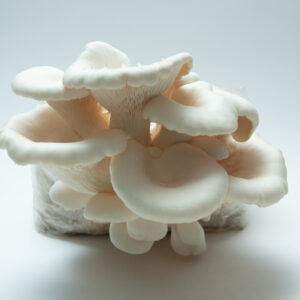
Scientific Name: Pleurotus ostreatus
Flushes : 2-3
Brand-Your kits made with Unicorn grow bags, USA
Lead time (mentioned in the listing above “add to cart” button) means time it takes to prepare this order. Product in stock does not mean its ready to send out, it means it can be prepared in the lead time mentioned.
Zero Maintenance Kit
Everything you need is included — just add water and follow the simple instructions.
Our substrate is a special Master’s Mix: a blend of sawdust and lupin hulls, inoculated with 300g of millet grain spawn to give your mushrooms the best possible start.
Microplastic Free
Soy Allergen Free
Gluten Free
About Tan Oyster (Pleurotus ostreatus)
Tan Oyster is a commercially popular Pleurotus ostreatus variant with warm-tan caps and productive, clustered fruiting. Like other oyster strains, it performs well on a variety of lignocellulosic substrates — pasteurised straw, hardwood sawdust (supplemented or unsupplemented), and many agri-residues work well. Substrate choice and supplementation strongly influence speed and yield.
Tan Oysters are often chosen for their attractive colour and ability to fruit reliably in the 15–24°C window, making them a solid option for growers in mild-to-warm environments or controlled indoor rooms.
Growing Conditions
Humidity: Keep high humidity during pinset and fruiting (≈85–95% RH) for strong, plump caps.
Light: Indirect ambient light (normal day/night cycle) is sufficient — avoid direct sun.
Air: Provide regular fresh-air exchange once pins form to avoid CO₂ buildup and elongated stems — gentle airflow is best.
Storage: Unopened kits keep a few weeks in a cool (2-4C) , dark place; yields may drop the longer they sit.
Common Mistakes to avoid
Humidity swings: Sudden drying or heavy condensation pooling harms pins — keep RH steady.
Poor fresh-air exchange: Inadequate FAE leads to long stems and small caps; too strong drafts dry the surface. Balance airflow after pins form. Oysters need higher airflow.
Incorrect substrate or over/under-supplementation: Substrate choice strongly affects speed and yield — balance supplementation and maintain good hygiene.
What if pins form inside the bag?
Don’t worry. Ignore the internal pins. Gently fold the top of the bag to push out excess air, cut a small X in the side of the bag where you want the mushrooms to grow, and begin misting that spot daily. The internal pins will be naturally aborted as they don’t have space to grow.
All mushrooms produce spores as part of their natural growth cycle. Some people may be sensitive or allergic to spores, so be mindful of where you grow them. Harvesting earlier — as the caps begin to flatten — will help you avoid heavy sporulation.
Instructions
Download your full step-by-step growing instructions from the link above. We recommend saving these before your kit arrives so you are ready to go.
Want to Learn More?
This kit introduces you to Stage 3: Fruiting — the final step in mushroom growing. To explore all three stages (from spores to harvest), check out our Educational Mushroom Growing Kit.
Checkout all our Spray and grow kits.
Checkout out our fine Misting Spray Bottle to produce tiny droplets and keep humidity high. The size of droplets formed can easily be evaporated , this constant evaporation signals mycelium to pin.
Could not fruit the bag, or was it contaminated? Send us a photo or call us, and we will help you resolve the issue.