
Introduction to mycelium based composites (MBC’s)
Mycelium is the rootlike structure of the fungus to which mushrooms are the fruiting body. Through mycelium the fungus is able to search for and absorb nutrients from the environment.
Fungi have many complex and important roles in nature, including as the great decomposers, producing enzymes that can break down a vast array of complex compounds into simple sugars and amino acids, Including enzymes that break down lignin, cellulose, latex and synthetic petroleum based polymers like polypropylene and paraffin wax.
The ability of mycelium to decompose, along with many interesting physical characteristics make it a fascinating and complex medium to design with. Mycelium will form into almost any shaped mold, it’s hydrophobic, fire resistant, insulating, and can be manipulated to take on a variety of mechanical characteristics and haptics through interactions between substrate choice, growth conditions and finishing treatments. Resulting materials can be rigid, flexible, spongy, leatherlike, or take on features of the substrate.
Exploring the potential of MBC’s presents an opportunity to support circular economies that can utilise existing waste streams as well as facilitating design solutions that have beneficial impacts in reducing future post consumer waste.
Making growth forms at home
Getting started with mycelium is simple when you know some basic tips. You can use your imagination to discover suitable mold forms around the home, but remember that material coming into contact with the mycelium growth medium needs to be non porous in order to ensure demoulding is easy. An ideal candidate is repurposing existing disposable plastic packaging. Plastic has the advantage of being more easily cleaned, sanitised and reused.
Another material that works well is cardboard, which can be shaped in many different ways to suit your purpose. Surfaces coming into contact with the inoculated medium should be covered with a layer of plastic tape. Cardboard molds have an advantage in being easily pulled apart, this enables greater control over the size and shape of forms.

It’s important to remember when incubating mycelium based composites that growing larger forms can sometimes promote anaerobic conditions in the centres of objects. Making objects with depths under 25 -30 cm and not compressing the medium unnecessarily, helps ensure there is adequate oxygen throughout the substrate. Another way to tackle this issue is to incubate separate parts and fuse them once colonised. Simply attach the pieces where you want them to go and leave the object inside a sealed box for 24-48 hours. Fungi have the remarkable property of creating networked joins that are structurally the same as the rest of the form.
Releasing objects from moulds and leaving them in a no oxygen environment, such as a sealed box, will also facilitate the development of a coating of aerial mycelium. This white coating, mainly composed of chitin, gives MBC’s a great amount of resilience in unsubmerged, yet exposed environmental conditions.
General materials needed for making and inoculating growth forms at home
- Mycelium-inoculated growth medium
- Cardboard
- Found plastic or cardboard packaging
- Masking tape
- Plastic packing tape
- Cling wrap
- Micropore tape
- Disposable gloves
- Scissors
- Scalpel
- Isopropyl alcohol 70%
Mold examples
Make a candle holder with two plastic containers
- Collect two different sized containers that can be nested, one inside the other. I’ve chosen two round plastic takeaway containers.
- It’s best to fill the mold below the level of the lip ridge or cut this away.
- Either mark the height you want on the outside or do it by eye when filling.
Make a pencil holder with a coffee cup and toilet roll insert
- Collect an unused coffee cup and a cardboard toilet roll insert.
- The cup will form the outside wall, the toilet roll insert will form the interior wall.
- The base can be covered with thin strips of plastic packing tape layered in an asterix shape. Once this is done a top layer can be added and the excess cut away. Both ends can be covered with tape to ensure that the mycelium growth medium doesn’t enter the inside when filling the mold.
- Cover the outside surface of the insert with plastic packing tape, making sure that there are no gaps in the plastic coating.
- The coffee cup will not need plastic packing tape.
Make a square container with cardboard and packing tape
- Corrugated cardboard and packing tape are great materials for making a variety of interesting shapes. You can find templates for different shapes online
- To make a box you will need to measure out two cube patterns. Decide on the size you want the outside of the container to be. Measure out a row of three squares in one direction, and perpendicular to this row, measure out two squares either side of the middle square.
- For the inside cube you will need to make the shape smaller to ensure the walls have adequate thickness. It’s advisable to have the walls at least 1.5cm thick. For a 1.5cm wall the interior box will need to be made from 3cm smaller squares, as this will allow a 1.5cm gap on each side
- Once you have cut out the two patterns for the square containers, cut along each seam with a scalpel. Be careful to not cut the cardboard all the way through.
- Bend each seam to see how the box forms. Each cube will be open at the top. The interior cube can be covered with tape at the top before filling.
- Before assembling, cover the forms with plastic packing tape to create a non porous layer between the cardboard and inoculated growth medium. Remember to put the tape on the inside for the larger box and on the outside of the smaller box.


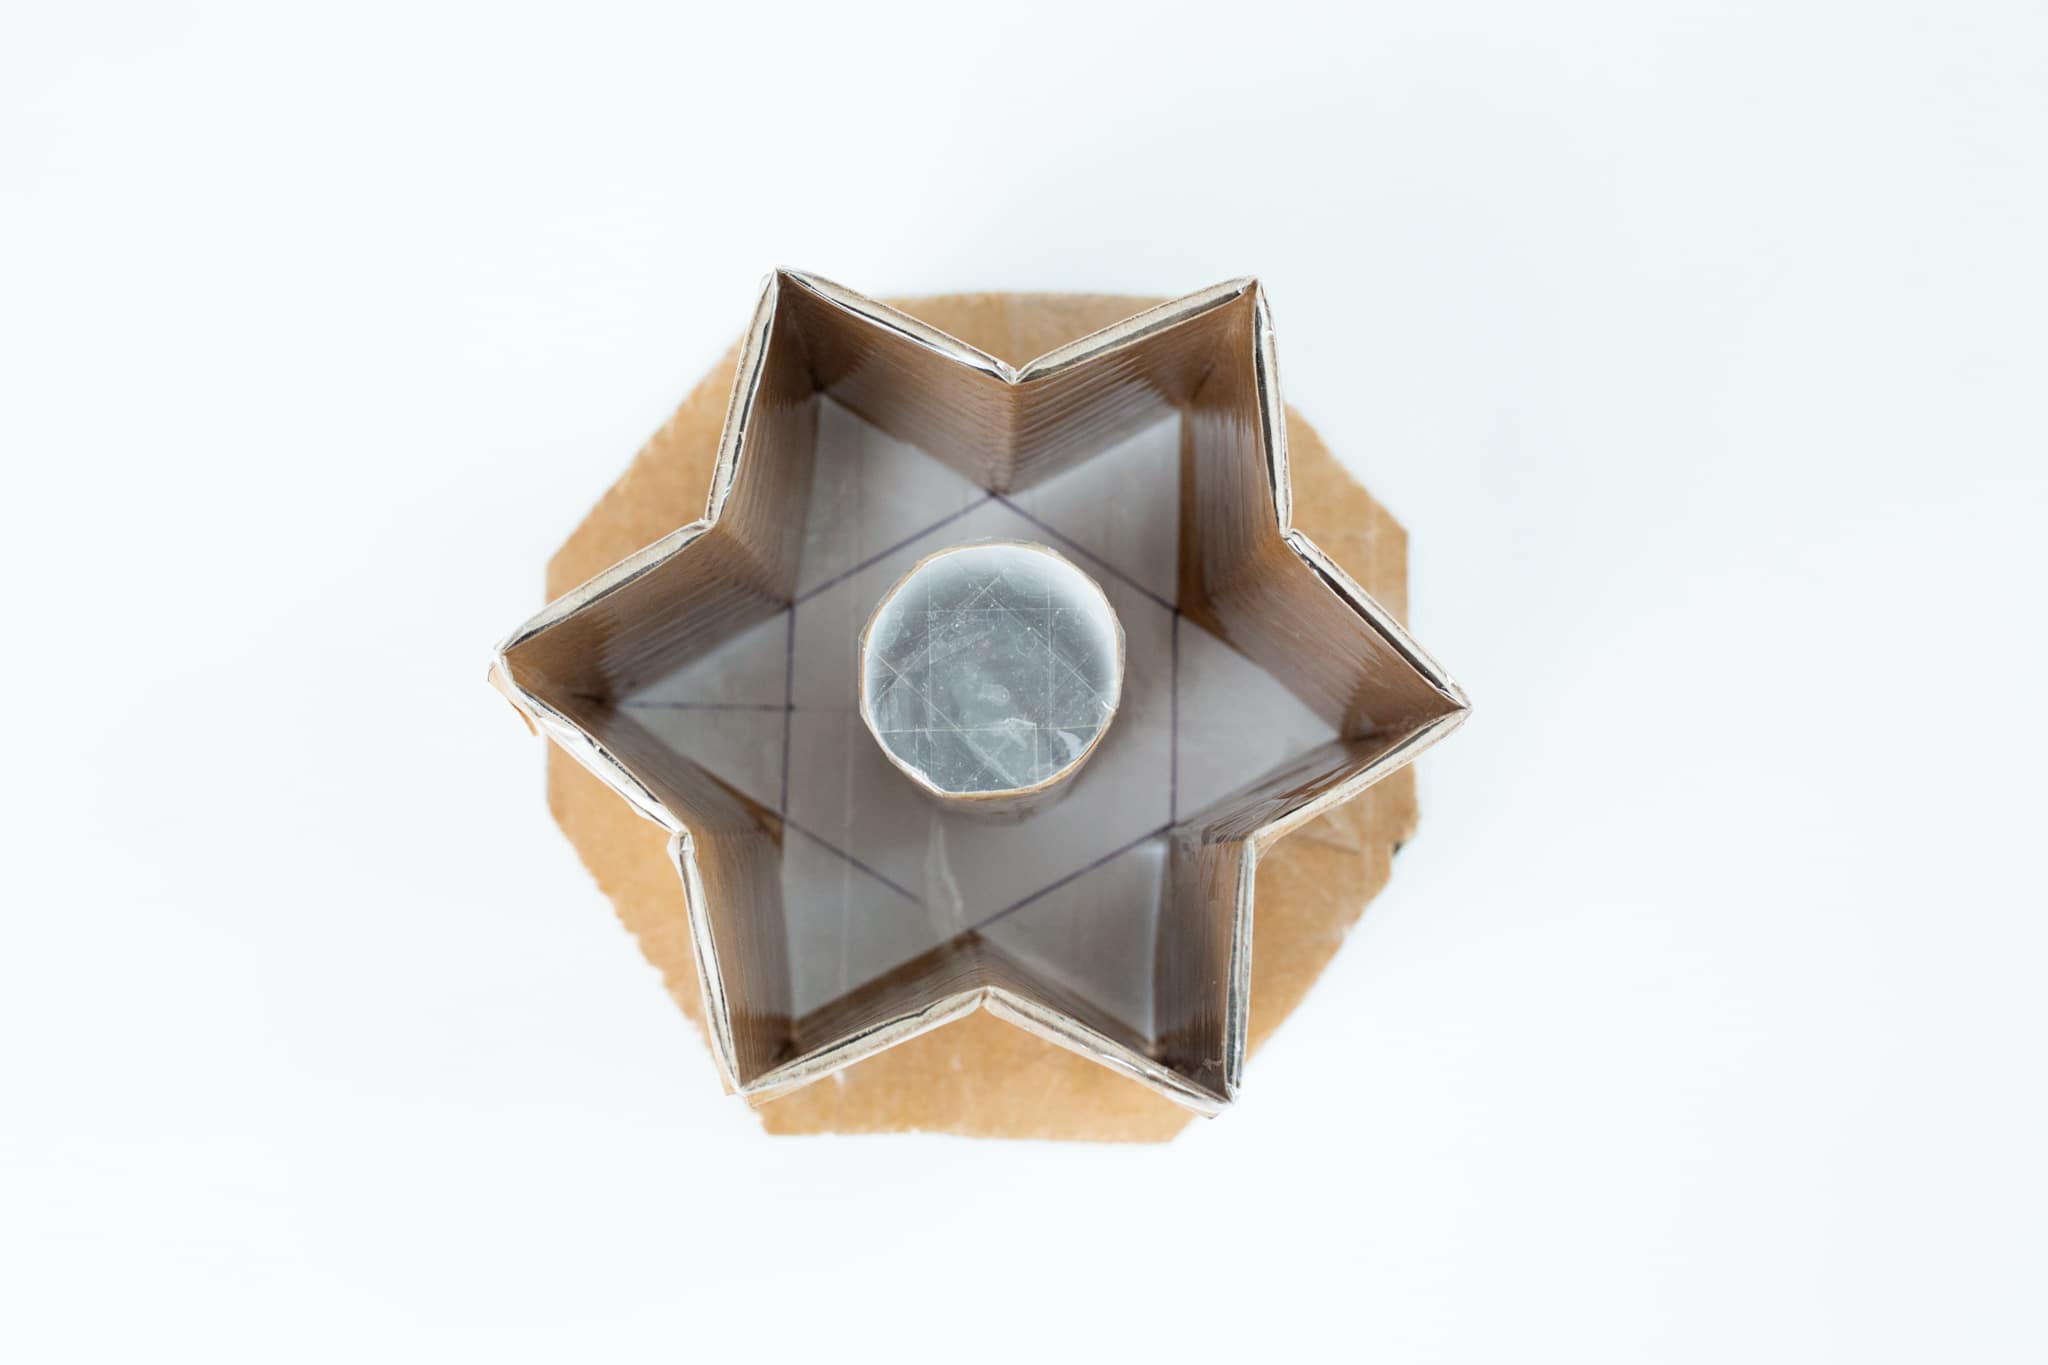
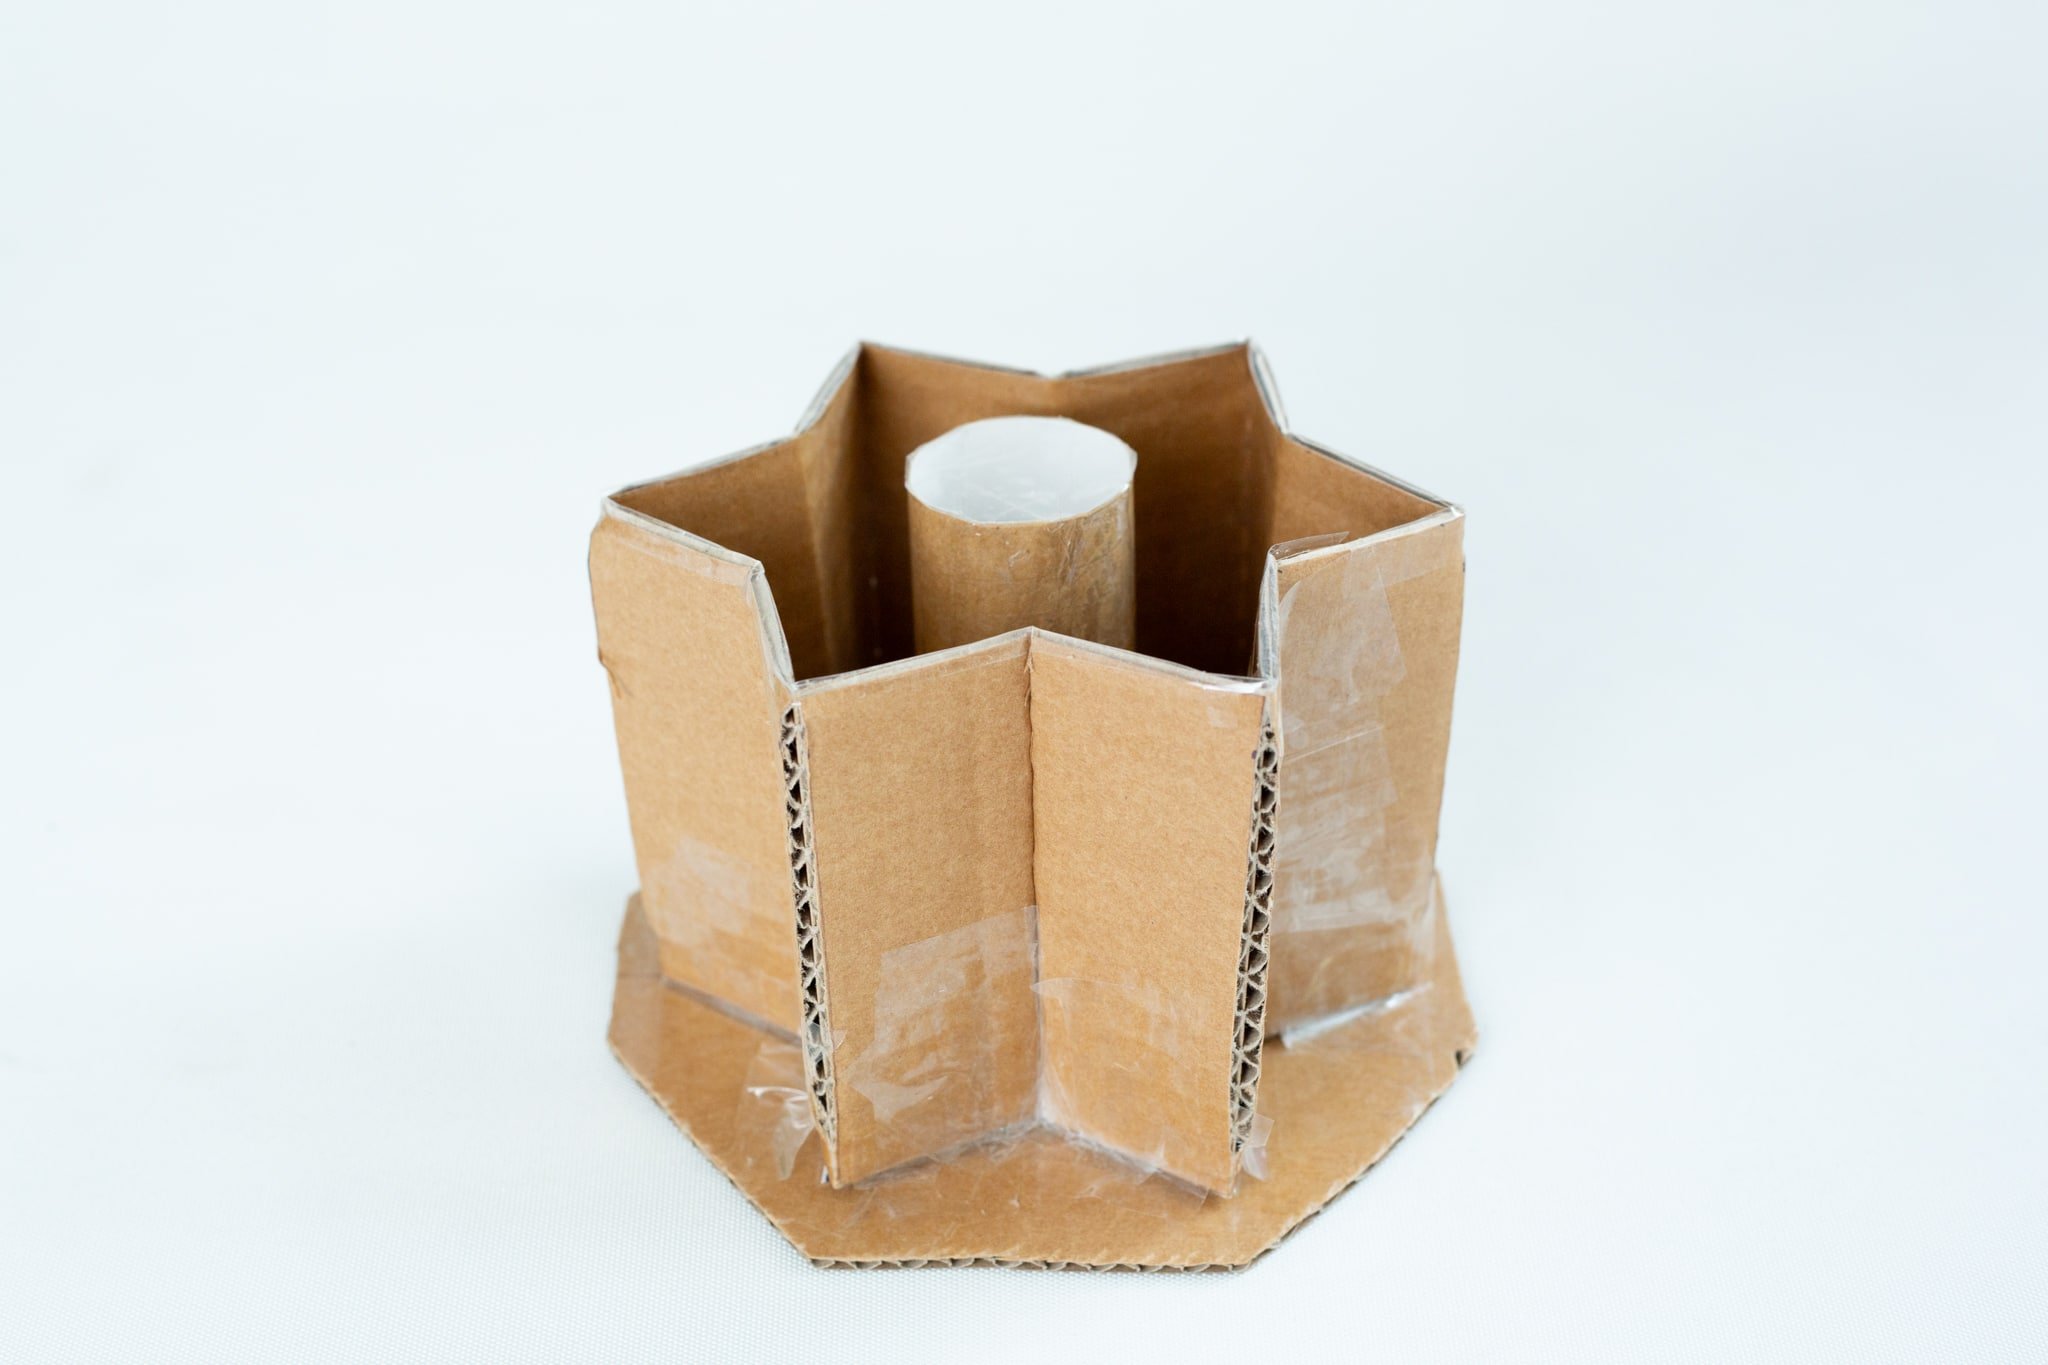
Make a star shape tea light holder with cardboard
- Collect some corrugated cardboard, paper and a toilet roll insert.
- Decide on the size you want, measure out two equilateral triangles of the same size, cut them out of the paper and draw a line down the centre of each triangle.
- Cut a square of cardboard large enough to contain the base of the star shape.
- Tape the edges of one triangle down to hold it in place. Align the triangles, one pointing up and another pointing down so they form a star shape. You can measure the points to be exact or do it by eye.
- Once the star is aligned, put some tape to hold it in place, then proceed to cover the base entirely with plastic tape.
- You will see that you have 12 edges of the points. Measure the size of one side of a point. You need this number to make the walls.
- You will need a rectangle of cardboard that’s 12 x the number you have just calculated. For example if one side of a point is 4 cm, you will need a rectangle that is 4 cm x 12. I.e 48 cm. The height can be any number you choose.
- Mark the rectangle of cardboard with these 4cm widths. Cut each line with a scalpel, ensuring you don’t cut all the way through the cardboard.
- Fold each cut so that it forms a series of points.
- Align the first edge of the cardboard perpendicular with an edge of the paper star and tape it down. Using a ruler to push the tape down can help ensure the wall sits flush with the base. Repeat the process with each wall.
- Once you have the last seam to join, tape it in place on the outside.
- You will need to tape up the seam on the inside to ensure the cardboard is not exposed.
- You can use a tape covered toilet roll for an interior wall, or repeat the process with a smaller star for the inside. Remember to cut away the edges of the base if you use a star shape for the inside and ensure all areas in contact with the mycelium growth medium are covered with plastic tape.
Tips for filling and incubating the molds
- Prepare the inoculation space by cleaning the surface where you will be working, wearing gloves and sanitising hands and equipment helps protect against contamination from competitor mould and bacteria in the environment.
- Sanitise the mold by spraying with isopropyl 70% and ensure the mold is fully dry before adding the inoculated substrate.
- Fill bases to the required depth before adding internal wall forms.
- Try to fill around each side equally, rotating the form as you go.
- Gently pull out the sides and lightly tap the object on a bench top to ensure material is adequately covering the needed areas.
- Ensure surfaces are smoothed over in the way you want before covering, though excess material can often be trimmed once the form is colonised.
- Cover the molds closely with plastic wrap, and poke a few small holes with a toothpick in the covering for air exchange. If you use larger holes and micropore tape, use two layers of tape for the filter.
- objects should not be left too long in the molds, as overgrowth with mycelium can sometimes hinder the de-moulding process.
- The objects should be ready in 5-7 days to remove from the molds. Once demoulded leave them for another 1-2 days inside a box to encourage the white coating to become more uniform.
- If you leave the object longer in the box, you’ll get red and brown patterning, it will also affect the surface texture.
- if you leave objects demoulded and still growing for too long, they can lose their shape, and may even start fruiting.
Tips for demoulding the objects
- Cut away any stray mycelium that has overgrown the edges.
- Run a knife along the seams to ensure the mold can come away easily.
- Gently massage plastic forms to loosen the objects.
- Cardboard forms can be demoulded by cutting sections and carefully pulling away the walls.
- Be careful with the forms at this stage, as they are much more robust when they are dried.
- Objects can be trimmed and even altered through compression at this stage.
- If cracks happen at this stage, objects may be able to be salvaged as pieces can be fused together by leaving them pressed together in an enclosed box for 24-48 hours.
Tips for drying the objects
- I recommend leaving the objects in a sunny spot for a week or so to dry naturally before putting them in an oven.
- Objects can be dried in the oven at 60-80 C for several hours with the door slightly ajar. Dried objects will reduce to approximately 70% of their original weight.
- Making a solar over in a cost effective way to dry mycelium based composites.
- Here are some instructions for a solar oven. https://www.homesciencetools.com/article/how-to-build-a-solar-oven-project/

As a fine arts graduate with a focus on sculpture from Sydney University and UNSW College of Fine Arts, I have explored anthropogenic relationships with the environment through various mediums. My notable works include "Resemblances," a solo installation at UNSW Galleries, referencing extinct Australian plants, and "Sydney Blue Gum High Forest", a miniature painting series highly commended at the Waterhouse Natural Science Art Prize (2020). Recently, my practice evolved through exploring sustainable sculpture, producing "From End to End," a myco-composite installation at Sculpture by the Sea (2022). I am continuing engagement with this innovative medium and experimenting further with the fascinating potential of designing with mycelium based composites.

