
- Getting Started with All American Sterilizers
- Beginner’s Guide to Growing Mushrooms in Buckets
- Start making your own Mycelium Objects
- Learn about Mushroom Grains
- All about Heat Sealer
- Beginner Mushroom Growing Kits
- Agar Plates
- Learn about Different Mushrooms
- Grow Mushrooms on Logs
- Mushroom Liquid Culture
How to Grow Oyster Mushrooms in Buckets at Home
Introduction
Growing mushrooms in buckets is one of the best ways to step up from a grow kit or a spray and grow bag. It is beginner friendly, the buckets last for years, and once the process clicks you can keep fresh mushrooms coming whenever you like.
This method suits side fruiting oyster mushrooms, so pick a strain that matches your local temperatures. The side fruiting oysters that grow well this way include Yellow, Blue Pearl, Pearl Giant, Pink, Tan, Phoenix, Winter White, Warm White, King of Pearl, Princess of Pearl, Sajor Caju, Chocolate, Grey and Curly Blue Oyster. Top fruiting varieties such as king oyster are not suited to this setup.
What You'll Learn
Side fruiting oyster mushrooms grow well in reusable 5 litre and 20 litre buckets. You pasteurise the substrate in a cold lime bath for about 24 hours. The bath stays alkaline for the whole soak, which is normal and expected, and is not meant to fall back to neutral while the straw is submerged. You drill 5 to 6 mm fruiting holes and resist the urge to add too many. You harvest while the cap edges are still turned down, for better quality and shelf life.
What You Need
Food grade buckets, such as 5 litre or 20 litre. Calcium hydroxide for the lime bath. Scales and a bowl for measuring the calcium hydroxide. pH test strips. A drill with a 5 to 6 mm bit. Substrate, such as grain straw or sugarcane mulch. Oyster grain spawn or sawdust spawn. A large plastic container for the lime bath. Mesh, shade cloth, or another draining setup. Micropore tape and duct tape. 70% isopropyl alcohol for sanitising tools and surfaces.
You can find everything for this method here.
Choosing the Right Substrate
Pasteurisation suits low nutrition agricultural waste, which gives oyster mushrooms enough to feed on without being so rich that contamination races ahead of the mycelium.
Grain straw is the best choice for this method. If you cannot get grain straw, pea straw is the next option, and sugarcane mulch is acceptable if that is what you have. Do not use lucerne. If you are using straw, cut it into pieces around 1 to 2 inches long so it packs into the bucket more easily.
More nutritious ingredients such as sawdust pellets and soy hulls are a different story. They need steam pasteurisation, double pasteurisation, or full sterilisation, and are not suited to a simple lime bath.
Understanding pH, and What Actually Happens in the Bath
pH runs from 0 to 14. Seven is neutral, below 7 is acidic, above 7 is alkaline. It is a logarithmic scale, so each step is a tenfold jump. Calcium hydroxide, also sold as hydrated lime or pickling lime, is a strong alkali. Stir it into water and the pH shoots to the top of the strip. That high alkalinity is the whole point. Most competing moulds and bacteria cannot survive it, while oyster mycelium shrugs it off, so the bath clears the field and hands your mushroom a clean head start rather than sterilising the straw.
Most guides, ours included, describe the bath climbing to the top of the scale and then falling back toward neutral, and say to use the straw once it has come down. Then the water sits high for days and will not move, and people assume something has gone wrong. Nothing has. The pH does return toward neutral, but on the drained straw once it hits the air, not in the tub while it is still under the lime. Those are two different stages. In the bath the reading stays high for the whole soak, which is exactly what you want. A day after draining, the straw eases to around 8 to 9, right where mycelium is happiest.
The reason the bath holds its reading is simple. Calcium hydroxide barely dissolves, only about 1.5 grams per litre at room temperature. Add the recommended 5 grams and only about a third dissolves, while the rest settles at the bottom as solid. That solid is a reservoir. As the dissolved lime gets used up, more dissolves to replace it and keeps the water pinned high. As long as any solid lime remains, the pH stays up, whether that is one day or five.
So at 5 grams per litre, do not wait for the number to fall in the tub, because it will not. Soak for about 24 hours, drain, and let the pH settle on the straw. One note on your strip: lime tops out around pH 12.4 to 12.6, and many strips read unreliably at the very top, so do not chase an exact figure. Strongly alkaline is all you need.
Make the Lime Bath
Fill your container with water. For a 30 litre container, use 30 litres of water. Measure 5 grams of calcium hydroxide per litre, so 30 litres needs 150 grams. Stir it through thoroughly and check with a strip that the water is strongly alkaline.
Measure enough dry substrate to fill your buckets, then add a little extra, because wet substrate compacts more than dry and it is easy to come up short. Push the substrate under the water and keep it fully submerged. A smaller lid weighted down with a bucket of water holds it under nicely.
Leave it for about 24 hours. At that point the pasteurising is done and the straw is ready to drain and use. Twenty four hours is the sweet spot. Leaving it longer does no harm and can start a little fermentation that helps the mycelium digest the straw, but it is not necessary, so do not feel you have to wait for anything to change in the water.
What About Hot Water, the Double Whammy
If you want a faster and more thorough clean, add your calcium hydroxide to hot water instead of cold. This is the double whammy, and it is the better pasteurisation.
You get two kills in one soak. The heat cooks off the competing moulds and bacteria, and the lime hits them with high alkalinity at the same time. Two different pressures at once, and the heat softens the straw and speeds the whole thing up, so this soak is measured in hours rather than a full day.
Here is the method that survives the temperature drop, because cold straw pulls the heat down fast the moment it goes in. Heat your water hotter than the target you actually want, to around 80 to 85 degrees, with the lime stirred in at 5 grams per litre. Pour it over the straw in an insulated drum, then get the lid on. The cold straw drags the temperature down into the 65 to 75 degree band, which is the pasteurising range, and the insulation holds it there with no burner running. Leave it sealed for 1 to 2 hours.
The reading that matters is the temperature of the straw and water together, not the water before you poured it. If you can, push a thermometer into the straw mass to confirm it settled into that 65 to 75 degree band. Too far below 60 and you stop killing the competition. Above about 80 and you start cooking the straw itself, which leaves a dead, sloppy substrate that contaminates easily.
After the hold, let it cool, then drain as normal. One thing not to expect, same as the cold method. At 5 grams per litre the pH will not fall to neutral in the drum, hot or cold, because there is far more lime than the water can dissolve and the reserve holds the reading high until the straw is drained. Heat does not change that. So the heat is there as a second kill, not to bring the number down, and the pH settles on the straw afterwards just as it does with the cold bath.
For a simple grow, the cold lime bath is all you need. For a faster, more thorough result, the hot pour over is the double whammy.
Prepare the Fruiting Holes
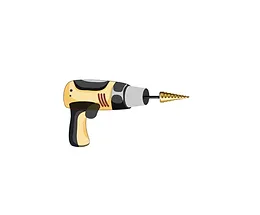
The holes decide where your mushrooms grow. It is tempting to drill lots, but fewer holes give larger clusters, because too many spread the available food across too many points. Use a 5 to 6 mm bit.
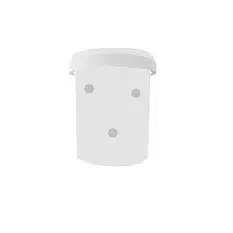
For a 5 litre bucket, drill two holes around the middle, away from the handle and well up from the base. Avoid drilling the base. If the substrate is drained properly, no water should pool down there, and base holes only invite contamination. Clean off any marker lines and cover both holes with micropore tape, which protects the substrate while letting the mycelium breathe.
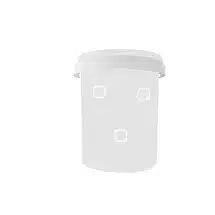
A 20 litre bucket can take eight holes, four around the upper section and four around the lower. Offset the upper holes from the lower ones rather than lining them up, so the clusters have room to develop without growing into each other. Cover four holes with micropore tape for the first flush, and the other four with duct tape, reserved for the second flush. This makes the second flush much easier later on. If a hole sits near the handle, tape the handle down so it cannot lift and knock a developing cluster.
Drain the Substrate
After 24 hours, lift the substrate out and drain it over mesh, shade cloth, or a similar setup that lets water run off freely. Draining usually takes around 3 to 5 hours. Before inoculating, squeeze a handful firmly. No drops should fall. If it still drips, give it longer. Substrate that goes in too wet is far more likely to contaminate before the mycelium takes hold.
Inoculate the Bucket
Grain spawn is the easy choice for a small number of buckets. Our grain spawn comes in a 300 gram size, which is right for a single 20 litre bucket, so it is simple to plan around when you want one bucket per variety. Sawdust spawn can produce more, since oysters are wood loving, and it works out cheaper per amount, but it only comes in a 3 kg size. A 20 litre bucket uses roughly 250 grams of sawdust spawn, so a 3 kg bag covers about 12 buckets of the same species. That makes it awkward if you only want a small grow or want to try lots of different varieties at once, so for small or mixed setups grain spawn is usually the more practical pick.
Whichever you use, aim for a spawn to substrate ratio between 10% and 25%. For a first grow, lean toward more spawn rather than less, because faster colonisation gives contamination less room to move.
Wipe the spawn bag, scissors, bucket and work area with 70% isopropyl alcohol. Break up the spawn inside the bag, open it with sanitised scissors, and mix it evenly through the fully drained substrate. Fill the bucket to the top, press it down gently until firm but not heavily compacted, fit the lid, and label it with the strain and the date.
If you have spawn or inoculated substrate left over, do not waste it. Put it in a ziplock bag, make a small hole, cover the hole with micropore tape, and once colonised it will fruit straight from that hole. The same trick works with all sorts of clean containers around the house.
Colonise the Buckets
Place the buckets somewhere warm, dark and airy, around 22 degrees. Colonisation usually takes 2 to 4 weeks. The mycelium needs to breathe, so avoid a sealed cupboard. Check now and then for any sign of contamination. Once the substrate is fully colonised and small mushrooms start to appear, it is time to move to fruiting conditions.
Trigger Fruiting
To bring on pins, which are baby mushrooms, mist the taped holes with a spray bottle to create a moist, humid pocket around them. As soon as pins start forming, stop spraying the holes directly, because the young mushrooms are tough enough to push through the tape on their own.
Keep the bucket somewhere humid while they develop. Humidity stops them drying out, but a direct draught from a fan or air conditioner will dehydrate them quickly, so keep that off them. Keep them out of direct sun too, since it can push the temperature past their comfort range. Blue pearl oysters can look off white under strong indoor light, and develop a stronger bluish colour with less light.
Harvest at the Right Time
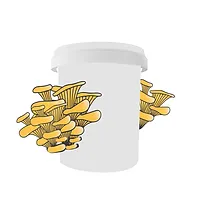
Harvest while the cap edges are still turned down. Once the caps flatten and start curving upward they are past their best and may already be dropping spores, and their shelf life falls away fast from there. Picking at the downturned stage gives you better mushrooms and a longer window to use them.
Get a Second Flush
After the first harvest, the bucket still holds a fully colonised block ready to go again.
On a 5 litre bucket, the mycelium may seal over the original holes. Sanitise a knife or scalpel with 70% isopropyl alcohol, leave it a minute, then carefully clear the mycelium blocking the holes. By now the block is fully colonised and more resistant to contamination, so there is no need to re tape. Leave the reopened holes exposed and let the next flush come.
The 20 litre bucket is even easier. Peel the duct tape off the four holes you reserved at the start. Those fresh points are ready for the second flush.
With reusable buckets, a simple substrate, and a bit of attention to cleanliness and moisture, this is a reliable way to keep oyster mushrooms growing at home.
Table of Contents
How useful was this post?
Click on a star to rate it!
Average rating 4.9 / 5. Vote count: 133
No votes so far! Be the first to rate this post.
Get Exclusive Updates - Subscribe Now!
Join our community and stay in the know! Subscribe to our newsletter for exclusive insights, first access to new content, special offers, and industry trends. Don’t miss out—sign up today!

Director of Rootlab







Just starting out in the exciting world of mushrooms and the various ways of growing them, my interest started by a video on YouTube was then brought to application by Rootlab. I’ve looked at their informative videos and instructions from their website and have purchased items from their website. I’ve started to grow mycelium in grain and am looking forward to taking it further with Rootlab’s valuable information and tutorials.